Info, tips and guides
Bugs
Documents
FAQs
Links
Where to buy
Downloads
TAPs
Linux tools
Mac tools
Windows tools
Toppy firmwares
Search
Forum FAQs
Forum index
Forum search page
Tools
Toppy.org.uk
TF5800 manual: scheduled recordings
Scheduled recordings
Of course, a lot of the time you’ll be using your PVR to record programmes because you won’t be in when they’re due to be broadcast, so you need to schedule recordings. Your PVR will work through the list, automatically recording at the appropriate time, and even wake up from standby if necessary.
Scheduling a recording using the EPG
The easiest way to schedule a recording is using the Electronic Programme Guide – the PVR will automatically set the correct time, channel and duration.
Before we go further, you need to know that there are two types of entry you can make in your PVR’s recording schedule.
The first is called ‘preselecting,’ which means that the PVR remembers that you want to watch the programme you’ve selected. It will switch to the appropriate channel at the right time, so that you don’t miss the programme, but it won’t actually record.
The second type of entry in the schedule is a recording; the PVR will switch to the appropriate channel and record the programme on its hard disk for you to watch later.
You can schedule up to seventy different events, and events can overlap each other, so you can tell your PVR to record a programme that starts on one channel, and then to change to another channel fifteen minutes later to watch something else, for example.
You cannot have more than two things scheduled at the same time, regardless of whether they are recordings or pre-selections, and you can’t pre-select two things at the same time – you can only watch one TV programme after all! If you try to schedule too many overlapping events, the PVR will display a message.
Now, let’s see how to create an entry in the schedule. It’s
very easy. Press the Guide button![]() to display the EPG. You can schedule from
both the single channel and the multi-channel views, so browse around the
EPG until you see a programme that you want to record, and move to it with
the arrow keys.
to display the EPG. You can schedule from
both the single channel and the multi-channel views, so browse around the
EPG until you see a programme that you want to record, and move to it with
the arrow keys.
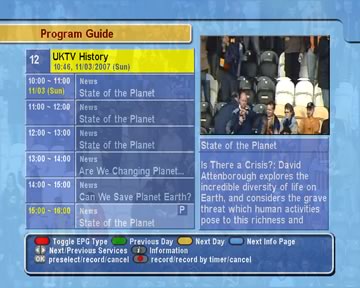
When you’ve highlighted the programme – the box containing the name will turn yellow – just press the OK button, and a letter P will appear in the box, like in the picture here.

That’s all you have to do, if you want to watch a programme. If you’d like to record it instead, just press OK again, and the P will turn into a red R. As you browse through the EPG, you’ll see the P or R markers on the programmes you’ve already scheduled.
If you decide that you’d like to remove the programme from your schedule, just move to it again and press OK. If the programme was pre-selected, the P will turn to an R; if it was already set to record, it will be deleted from the schedule – so two presses of OK will delete a pre-selection.
You can also schedule a recording with one key press in the EPG by highlighting a programme and pressing the Record button; the red R mark will appear.
Altering the details
As you can see, scheduling recordings couldn’t be easier. But what if you’d like to record a programme each time it’s on? Then, you’ll need to create a timer that repeats automatically.
And what about programmes that start or end at the wrong time? It’s frustrating to miss an important part of something because the news went on longer than normal.
Don’t worry – it’s very easy to alter the details of a recording that you’ve set from the EPG. You can do it at the same time as you schedule the recording, or later, by finding the P or R in the EPG.
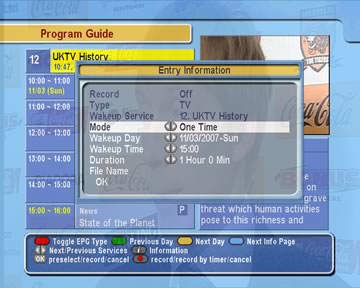
Either way, all you have to do is press the Record button when the entry is highlighted in the EPG, and this screen will appear.

The top three items can’t be changed; for a pre-selection, the Record type will say Off, while for a recording it will say On. If you want to change between the two, press Record again to close this screen, and then use the OK button to change between pre-selection and recording.
The first item you can change is labelled Mode, and is how often the recording will be made. To start with, it will be set to One time, Use the arrow keys to select other options, depending on when the programme is repeated.
Use Weekly to record on the same day each week, for example a programme that is on every Thursday.
Use Every Weekday to record at the same time, Monday to Friday.
Use Every Weekend to record at the same time on both Saturday and Sunday.
Use Every Day to record at the same time, seven days a week.
Below, you can choose the date on which the first recording will take place; use the arrow keys to change the date.
Next, you can change the start time and the duration; you may want to do this to ensure that you record the whole of a programme, even if it starts a few minutes early, or ends a few minutes late.
The start time and duration are independent of each other, so if you have selected a one hour programme that is due to start at 19:00, and moved the start time to 18:57, remember that the duration will also need to be increased to 63 minute to finish at the original time, or longer if you want to allow for late running as well. If you change the start time so that it moves from one site of midnight to another, remember to change the date too.
Underneath the running time, you’ll see the name that will be used to store the programme on the PVR’s hard disk. We’ll explain later in the manual how you can change it. For now, simply move down to the next line, and press OK to save your changes to the schedule.
You can abandon your changes to the schedule by pressing the Record button while the editing screen is displayed.
If you have altered the details of a recording, for example by changing the start and end time, or setting it to repeat, you will see that the R symbol in the EPG is changed to Rt.