Info, tips and guides
Bugs
Documents
FAQs
Links
Where to buy
Downloads
TAPs
Linux tools
Mac tools
Windows tools
Toppy firmwares
Search
Forum FAQs
Forum index
Forum search page
Tools
Toppy.org.uk

TF5800 manual: switching on
Switching on for the first time
Now that you have your PVR connected, you should plug it in to a mains socket, and switch on at the wall. Ensure that your television set is turned on and that the correct input or channel has been selected, so that you will be able to see the display from the PVR.
Now, press the Standby button on the front of the PVR or![]() on the remote control.
As the PVR starts, the front panel display will show first C4.56, followed
by the word ‘run’. You will need to perform some initial set up steps before
you can start using your TF5800.
on the remote control.
As the PVR starts, the front panel display will show first C4.56, followed
by the word ‘run’. You will need to perform some initial set up steps before
you can start using your TF5800.
Searching for TV and radio channels
The first step in setting up your PVR is to search for the available TV and radio channels.
If there are no channels stored, you will not be able to access other menu options. If you ever use the Factory Setting option in the menus to fully reset your PVR, you will have to perform this procedure again.
When you turn on the PVR, it may automatically display the
Service Search screen. If not, press the Menu button![]() on the remote control,
move to Installation with the arrow keys, then press OK
on the remote control,
move to Installation with the arrow keys, then press OK![]() .
.
On the next screen, move to Installation, and press OK again. Next select Service search and press OK.
On the next screen, move to Search Mode and ensure that the Auto option is selected – you can change options by using the left and right arrows.
All the system menus work in this way; in future, we’ll simply explain which options to select; remember to move up and down to highlight menu entries, left and right to change the options, and OK to select or confirm.
Next, move down to Start search, and then press OK. The PVR will start to search for channels, and will display a list of TV and radio services as they are found.
It may take several minutes for the search, and it is common for no channels to be found until quite late in the process. Be patient; when the scan is complete, you will see a message telling you how many TV and radio channels, or services, have been found. Press OK to save the list, and then press Menu to move back to the main menu from the Installation screen.
If you receive signals from more than one transmitter, or are in a poor reception area, you may miss some channels, or receive duplicates of others when searching. You can find out how to resolve this problem in the Advanced Features section of the manual.
Basic system settings
As well as tuning your PVR in to the available channels, there are also some other settings that you should check, to ensure that you get the best performance from your new TF5800.
Remember that you’ll also need to check these settings if you decide to perform a full reset of your PVR at any time.
Time and date options
First, we’ll set the time options, which ensure that the PVR knows where it is, and displays the correct time for programmes in the Electronic Programme Guide. From the Main menu, choose System Setting, and then Time setting. You should see a screen like this one.
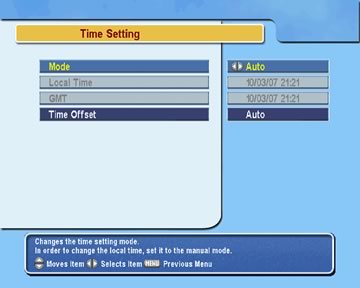
First, select the top item in the menu, Mode, and ensure that it is set to Auto; this will allow your PVR to receive its time signal from the television stations, keeping it accurate all the time.
Next, move down to Time Offset. The left and right arrow keys change the offset in fifteen minute steps; if you are not in the United Kingdom, you should use this option to select the correct difference between your time and GMT (or UTC as it is also known). Remember that this difference may change with the start or end of summer or daylight savings time.
If you are in the United Kingdom, you should ensure that the Time Offset is set to Auto; use the left key to decrease the time offset to 00:00, and then press left once more; the offset will now say Auto, and your PVR will automatically change to and from British Summer Time.
Return to the previous menu, System Setting, and select A/V Output Setting.
AV output settings
The AV output settings screen allows you to set the PVR options to match your television set.
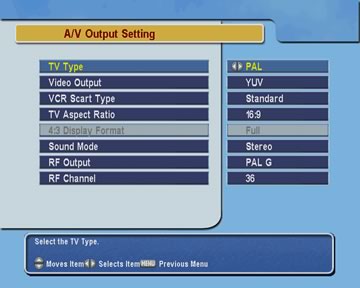
Set the TV type to PAL for most European television sets.
The Video Output option selects the type of video signal that will be sent via the TV SCART socket. You can choose between RGB, S-Video, YUV (also known as Component video, and used with some flat-panel displays), and CVBS, also known as Composite video. For most televisions, you will get the best picture by choosing the RGB option. If, while you change this option, the picture on your television disappears, or changes to black and white, simply use the arrow keys to select another option, until you can see the display correctly. Some televisions may take a few seconds to adjust to a new setting.
Use the VCR SCART setting to change how the signal from the VCR SCART connector is passed through to your television. When set to Standard, it will be automatic, and so will depend on the device you have connected to the VCR SCART; for example, a video recorder’s picture may display only when it is playing, while a DVD player may display all the time. If you set this option to External A/V, then the picture from the device you have connected to the VCR SCART connector will only appear on your television when you select it via the Satellite button on the remote control.
If you have a widescreen television, you should set the TV Aspect Ratio option to 16:9; for a conventional television set, set it to 4:3.
The 16:9 Display format controls how widescreen programmes will appear on a non-widescreen television. If you select Letter Box, then the picture will appear with black bars top and bottom; select Center Extract to see a picture that fills the whole screen, with some of the side information lost.
You can cycle through the different display size options by pressing the 0 button on the remote control while watching a programme; a message will appear in the top right of the screen telling you which option has been selected, and the settings in this menu will also change.
The Sound mode allows you to select stereo, mono, left or right channels; you should normally leave this set to Stereo.
The RF Type should be set to PAL-I for UK television sets, and controls how the sound is sent when you are using the RF OUT connector on the back of the PVR to link to your television.
If you are using the RF OUT connector, you may also need to change the RF Channel option; it will initially be set to 36, which is the same channel used by many video recorders for their outputs; if you experience interference, you should change this to a spare channel number.
If you do alter the RF Channel, you will also need to change the appropriate tuning settings on any televisions connected to the RF OUT connector.
When you have made the necessary changes, if any, to the settings in this menu, you’re ready to start using your PVR. Press the Exit key on the remote control to leave the menus, and turn to the next chapter, where we’ll explain the basic features and how to use them.